Roof Anatomy- Identifying The Pieces and Functions of a Roof
Roof Anatomy- Identifying The Parts and Functions of a Roof
Looking to understand Roof Anatomy? Oftentimes, roofing contractors start throwing out roofing jargon without educating the homeowner. Fluency in roofing terms is key to speaking and understanding what roofers are talking about.
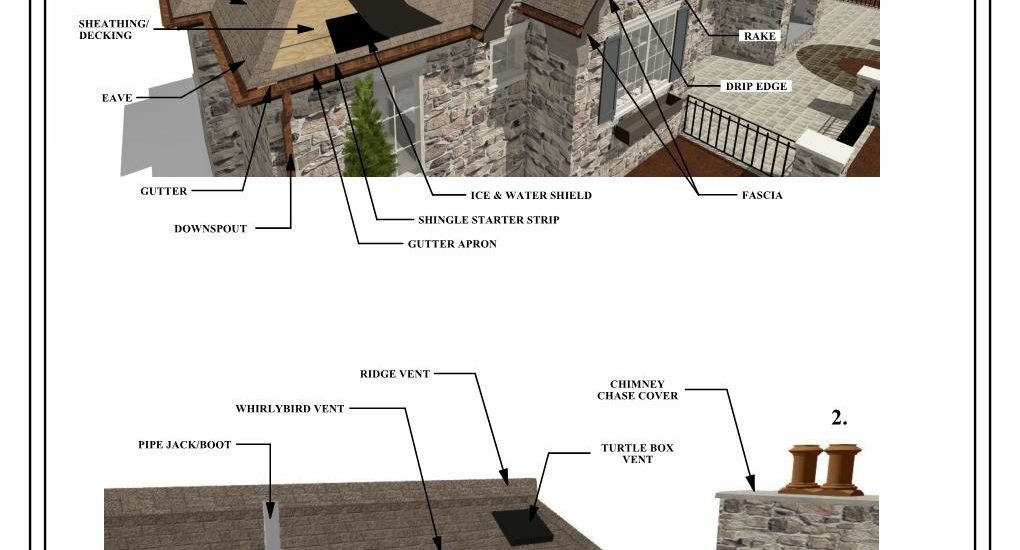
Here is a diagram to explain the various components of a roof and their function:
Common Roofing Terminology
Shingles
This is the very top layer of the roof and your first line of defense against weather elements. Usually made of asphalt, fiberglass, or wood. It also protects against UV rays and is aesthetically important to your home.
Hip and Ridge
The ridge is the highest peak of the roof and laid out horizontally. The hip uses the exact same product, however, it’s on angle peak of two adjoining sections on a roof.
Felt
The felt, sometimes call felt underlayment, is the most important and final layer of defense from your home against the elements. Felt is laid between the roof decking and shingles and is a moisture barrier. Mutual Roofing uses synthetic felt instead of the traditional 15 lb tar paper because it doesn’t expand/contract and is much more durable.
Sheathing/Decking
OSB (Oriented Strand Board) is an engineered wood similar to plywood that is used by most roofers and even flooring companies. It’s comparable to plywood in strength and durability. The OSB sits on top of framing and buttons frame together.
Ice & Water Shield
In 2009, the city of Omaha added ice and water shields as a requirement to all residential roofing projects. The specific requirement is 24 inch layer of the shield past the heated exterior wall below it, but Mutual Roofing generally goes 2 to 3 feet past code. One other interesting thing is that we install it over your garage even though it’s not a heated space (and thus not required).
As our owner puts it, the Ice & Water shield is like “felt on steroids”.
Shingle Starter Strip
As the name suggests, the shingle starter strip is placed along the eves- everywhere there’s a gutter. It sits on top of the gutter apron and segue into the start of the shingles.
Gutter Apron/Drip Edge
The gutter apron, again, works much like the name suggests. It’s an L-Shaped flashing that hangs over the gutter to allow water to flow from the room directly into the gutter. The recommended amount is a quarter of an inch for every 8 feet of gutter sloping.
Gutter
The gutter is an important component of any roofing system as it acts as a water trough. The gutter catches water off the roof and directs it aways from the home’s foundation.
Downspout
Oftentimes people confuse the downspout with the gutter. However, the downspout is a vertical pipe that carries the rain water (or melted snow) to direct it away from the home, particularly the foundation.
Gable/Rake
The Gable is the triangular portion of a wall between the edges of the roof that intersect to the pitch. Similarly, the rake is the actual ascending/descending edges on the side of the gable.
Fascia
Fascia is on all the rakes, gables, and eaves. This is the part where we hang your gutter hang on and is usually made of fiber cement, real wood, or press board.
Soffit
The soffit is the overhang siding under a roof. Porch lights or exterior electrical outlets are placed usually on the soffits.
Top of Roof Components (Things that stick out)
Pipe Jack/Boot
The Pipe Jack/Boot usually vents toilet/sewage gases. Comprised generally of PVC or lead, it’s purpose is also to keep water out.
Whirlybird Vent
The whirlybird vent is the outtake ventilation on your roof. It generally pulls 6x as much as the turtle vent and gets humidity and heat out of roof/attic space so it can breathe (and not mold).
Ridge Vent
The ridge vent is another type of roof outtake ventilation. Unlike the standard vents that stick out, the ridge vent has a lifted plastic piece (called a baffle) to let moisture escape.
Turtle Box Vent
Most homes have several turtle box outtake vents across their roof. Located nearest the ridge, the turtle box Static vent lets humidity to escape attic.
Note: Though our illustration shows the different types of vents, most homes generally have the same type of ventilation throughout.
Roof Anatomy doesn’t have to be so hard. We hope you were able to familiarize yourself with these terms through the visual illustration. Click here to download our free Roof Anatomy Diagram.
When speaking with roofing contractors, these are the most common roofing terms that you will hear. Call Mutual Roofing if you need a FREE Roof Inspection at (402) 889-3381.
[…] need to look further into the underside of sheathing board. (Remember your shingles https://mutualroof.com/2018/06/11/roof-anatomy/sit on felt and then sheathing) We’ll be able to see all the nails and check for rust. […]